| PerfectRouter.com DD-WRT Router Tutorial |
Configuring as an AutoAP
AutoAP is a script that may be installed on a DD-WRT router which will allow it
to automatically scan for open WiFi, check them for validity, and connect to the
strongest signal. In the event the connection is lost, the script will
automatically perform another scan and connect to the new strongest signal. This
implementation is useful for maintaining an internet connection where the router
is being used as a repeater and in a mobile environment.
By default, DD-WRT is configured as an open / unsecured AP with the wireless name 'dd-wrt'. If you want to use the router as an AutoAP you will need to change a few settings. This is a relatively straightforward process, which will be shown in this tutorial.
You should start by setting up the setup page password as shown in the Getting Started tutorial, so you can get to the various tabs of the setup page.
Next, you will need to connect a working internet connection into the DD-WRT router's internet port, as it will need to download the AutoAP script from the internet. You do not need to set the DD-WRT router up in place of your existing router. Just run the cable from one of the switch ports of your existing router to the internet port of the DD-WRT router. You do not need to set up security or a customized Wireless Network Name (SSID), yet either. Otherwise, follow the Access Point tutorial to do this. Once you have established that you have internet access on the DD-WRT router, resume setting up AutoAP.
Make sure you are connected to the DD-WRT router by either an ethernet cable to one of the four switch ports, or to the wireless network 'dd-wrt' before attempting configuration.
The setup page by default is located at http://192.168.1.1 and is accessible by entering the address into a web browser.
You will want to initially configure the repeater in close proximity to the AP you are trying to repeat. This is to assure that range is not an issue, and to make sure everything is functional before putting the repeater in its final location. Be sure that this AP is configured to be open / unsecured.
Changing the Router IP
The first thing you will need to do when configuring for use as an AutoAP is to change the IP of the DD-WRT repeater. This is done to avoid IP conflicts with the distant host AP you are trying to repeat. Go to the Setup>Basic Setup tab. Then, in the Network Setup>Router IP section change the Local IP address from 192.168.1.1 to 192.168.3.1 as shown.
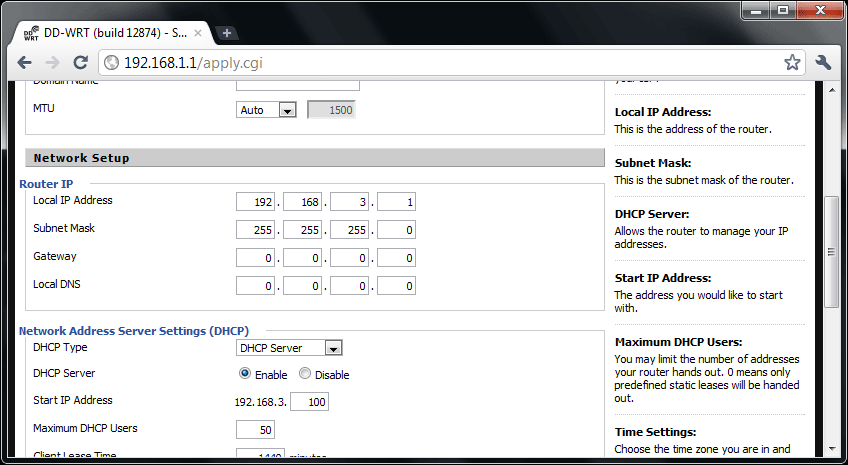
Be sure to click the save button at the bottom of the page. Then, click the Apply button. The DD-WRT router will then reboot, and you will need to disconnect, then reconnect your wireless or wired connection. The setup page URL will then change to http://192.168.3.1
Installing the AutoAP Script
Go to Administration>Commands, then copy and paste the following into
the box, making sure to get the "&" at the end:
nvram set wl_ssid=""
`cd /tmp; until [ 2 = 1 ];do /bin/sleep 30;
/usr/bin/wget -Oautoap.sh http://downloads.sourceforge.net/autoap/autoap_090711.sh;
chmod 777 ./autoap.sh;./autoap.sh;done` &
Click the Save Startup button. Your Administration>Commands tab should then look like ours.
nvram set wl_ssid=""
`cd /tmp; until [ 2 = 1 ];do /bin/sleep 30;
/usr/bin/wget -Oautoap.sh http://downloads.sourceforge.
chmod 777 ./autoap.sh;./autoap.sh;done` &
Click the Save Startup button. Your Administration>Commands tab should then look like ours.

Go to Administration>Management and click Reboot Router. In about 30 seconds reconnect to the DD-WRT router. The script should be downloaded.
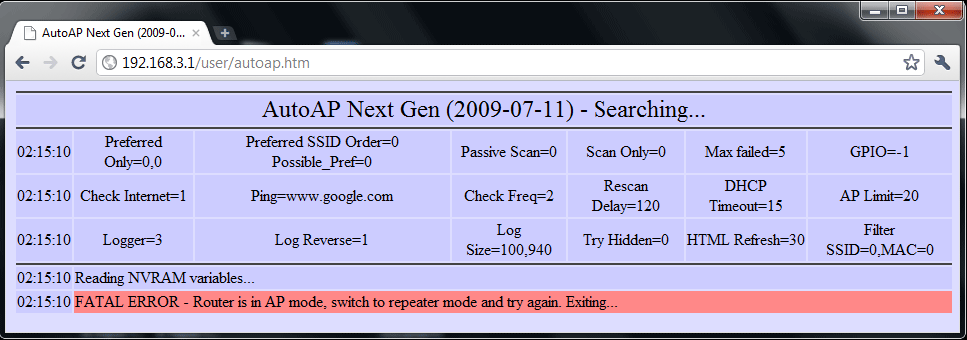
You can check to assure that the AutoAP script has downloaded and check its current status by going to http://192.168.3.1/user/autoap.htm in your web browser. This page seems to work best when using Google Chrome.
Here is what it should look like at this point, when the router comes back up. If it does not, wait a minute. If it still does not, reboot the router and try again, making sure you completed all of the steps up to this point.
Now, we will need to set up the wireless connections in the DD-WRT setup pages that give the unit repeater functionality.
Unplug the ethernet cable from the DD-WRT router's internet port.
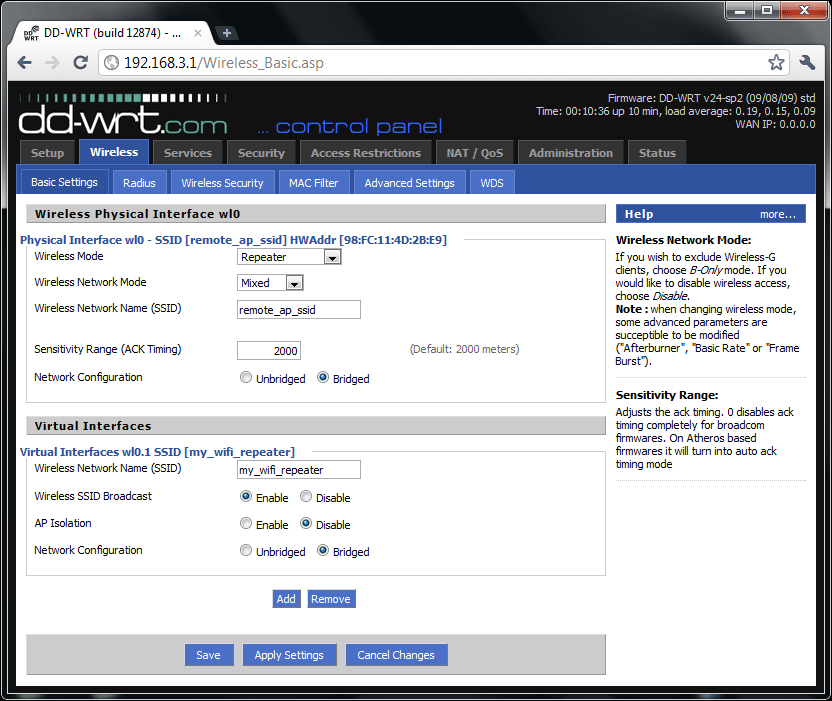
On the Wireless>Basic Settings tab under Physical Interface set the following items:
Wireless Mode: Repeater
Wireless Network Mode: Mixed
Wireless Network Name (SSID): remote_ap_ssid
Wireless Channel: Auto
The SSID does not really matter for the Physical Interface, but something must be entered for the moment. It will be automatically changed by the script when we apply the settings later.
Then Save. Do not click Apply yet, otherwise you will need to plug your laptop in to the DD-WRT router by wired ethernet to finish configuration.
Under Virtual Interfaces click the add button.
In the Wireless Network Name (SSID) field, enter the name you would like for the local DD-WRT repeater signal. For our example we will use 'my_wifi_repeater'.
Then Save. Do not click Apply yet, otherwise you will need to plug your laptop in to the DD-WRT router by wired ethernet or reconnect to the new SSID to finish configuration. A screen capture of our example configuration Wireless>Basic Settings page is shown below.
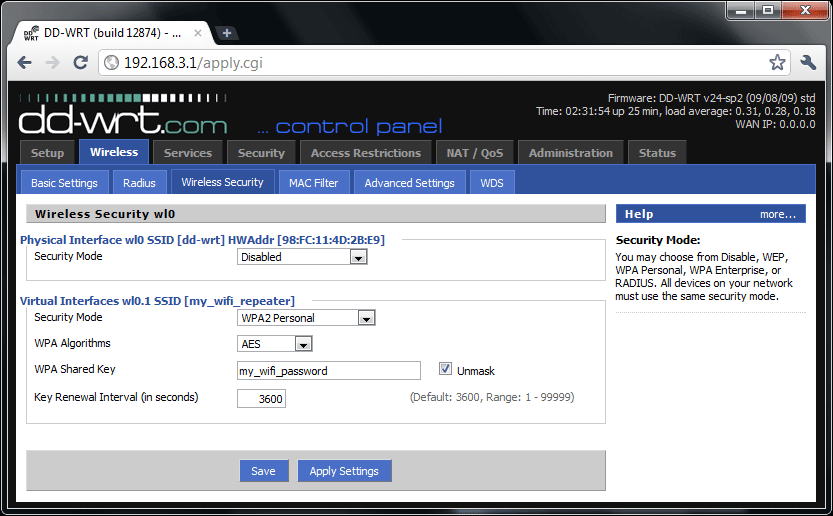
Now, go to the Wireless>Wireless Security tab. Leave the top Physical Interface section disabled.
In the lower Virtual Interface section you will enter your desired security settings for the repeater's wireless connection that you will connect to.
Typically it is best to use the following security type for your Virtual AP, if you decide to use security at all.
Security Mode: WPA2 Personal
WPA Algorithms: AES
Password: Must be equal to or greater than 8 characters
Key Renewal Interval (in seconds): 3600
It is not advisable to use WEP as anyone can acquire tools online to break into a WEP secured network. WPA and WPA2 are currently unbreakable network security methods. If you use a simple password someone could guess it, however.
Our example configuration is shown.
Click Save, wait a moment, then click Apply Settings. The router will take a moment and reboot. You should disconnect, then reconnect either by wired ethernet or to the new SSID. If the repeater is able to make a successful connection to a host AP, you will be able to access the internet and the host AP's network by connecting to the DD-WRT router's wireless network. The DD-WRT router may take up to a minute to come up then connect after applying the settings, so be sure to refresh your list of wireless networks and give it a moment.
If you aren't able to reach the internet or the remote / host AP's network, then it is likely that there are no open AP's with working internet in range. You can check to see if the Physical Interface connection is working properly by refreshing the DD-WRT setup page and looking at the upper right corner. If you see WAN IP: 0.0.0.0 then your DD-WRT router is not connecting to a remote AP. If you have anything other than 0.0.0.0, then your Physical Interface is set up properly, the DD-WRT router is getting an IP address from the AP, and everything should be working.
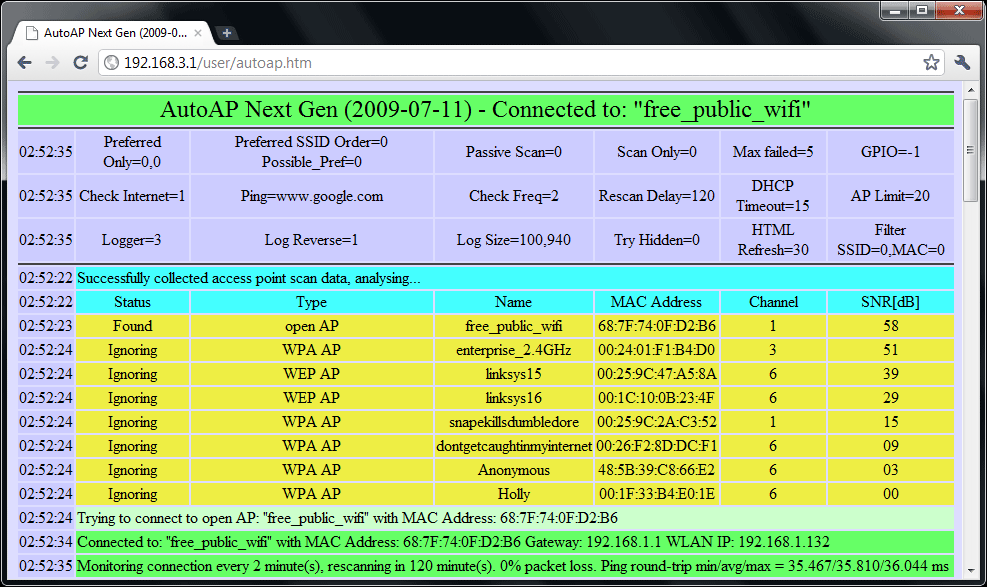
You can also check http://192.168.3.1/user/autoap.htm when connected to the DD-WRT router to see the current AutoAP script status.
Here is a screen capture of our example unit's script page when operating with an open AP nearby.
AutoAP also has several settings that can be optionally customized. In order to do this you must telnet / SSH into the router. A list of the settings may be found here. For most implementations this does not need to be done.
Test to make sure everything is working as expected. Be sure to make a backup as mentioned in the section of the tutorial below.
If you want to cease using the DD-WRT router as an AutoAP, reset the unit to defaults as mentioned below.
A few more tips..
Feel free to explore the DD-WRT setup page on your own, but be sure to make a backup when you get a working configuration for your implementation. This is done under Administration>Backup and will allow you to restore your configuration in the event something goes awry.
If you really mess up the configuration or forget a password, you can always reset the unit back to the default configuration. This is done by powering up the unit, then holding the reset button on the back of the router with a pen for about 20 seconds or until the power light flashes at a regular interval. About a minute later the unit will have rebooted and be accessible again.