| PerfectRouter.com DD-WRT Router Tutorial |
Configuring as a Repeater Bridge
By default, DD-WRT is configured as an open / unsecured AP with the wireless name 'dd-wrt'. If you want to use the router as a repeater bridge, you will need to change a few settings. This is a relatively straightforward process, which will be shown in this tutorial.
You should start by setting up the setup page password as shown in the Getting Started tutorial, so you can get to the various tabs of the setup page.
After that, configure the router to function as a normal repeater by following the Repeater tutorial. Once everything is functioning as a normal repeater, follow this tutorial to alter the configuration to be a repeater bridge.
A repeater bridge is essentially the same as a repeater, however a repeater bridge uses the DHCP server of the existing network so that all computers are on the same subnet. In most cases a normal repeater is fine and a more desirable setup, but some networks may have resources such as network storage or print servers that will not function correctly with devices on different IP networks.
Make sure you are connected to the DD-WRT router by either an ethernet cable to one of the four switch ports, or to the DD-WRT router's wireless network before attempting configuration.
You will want to initially configure the repeater in close proximity to the AP you are trying to repeat. This is to assure that range is not an issue, and to make sure everything is functional before putting the repeater in its final location.
Changing Repeater to Repeater Bridge
Bring up the DD-WRT setup page.
Look at the upper right corner at the numbers next to WAN IP:. These should not be 0.0.0.0, if they are then you will need to go back to the normal repeater tutorial and assure that you are connected to the host AP.
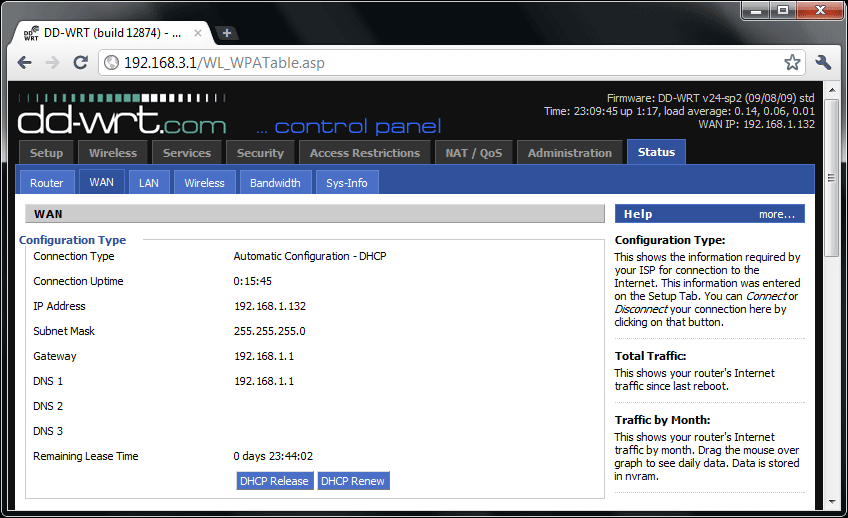
In our example it is 192.168.1.132. Of these, the first three numbers are important. You will need these in a moment, so write them down.
Go to the Status>WAN tab. The WAN IP should match the number next to IP Address in the WAN>Configuration Type section.
You will also need the numbers next to Subnet Mask and Gateway. For reference, here is what we are working with on our example for the tutorial. Your numbers may be different.
Once you have all of these, go to the Wireless>Basic Setup tab and change the Wireless Mode to Repeater Bridge for the Physical Interface. Click Save. Do not click Apply yet, we will get to that later.
Unlike with normal repeater mode, for a repeater bridge on Broadcom devices, the security settings need to be set to be identical for the Physical and Virtual Interfaces. You must have the exact same security settings for the Physical Interface and Virtual Interface. Go to the Wireless>Wireless Security tab. Copy all of the information from the Physical Interface section to the Virtual Interface section so that they match. Then, click Save.
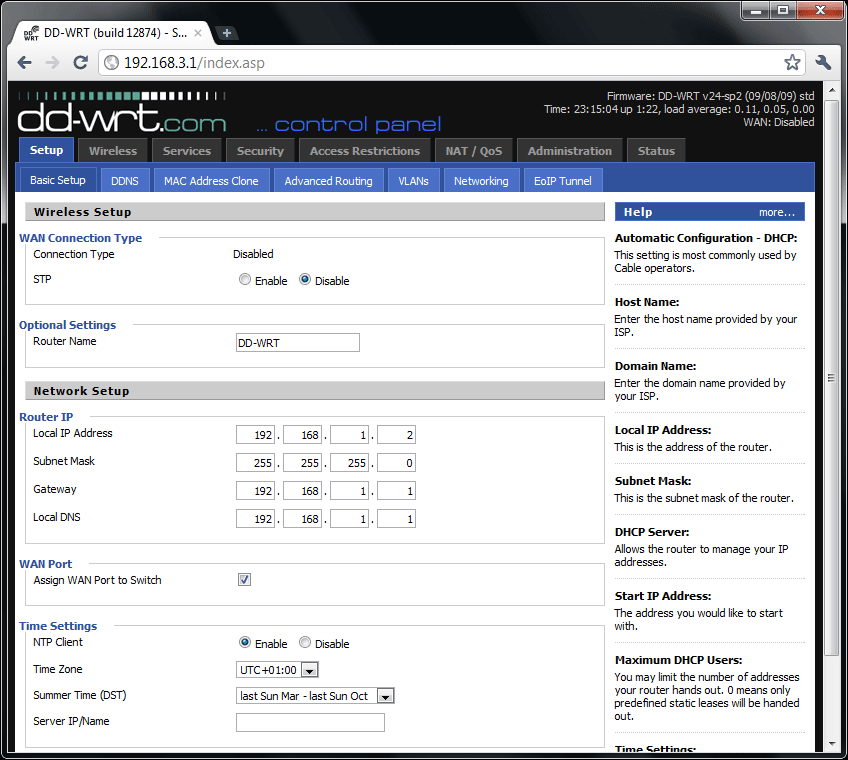
Go to the Setup>Basic Setup tab. Assure that STP under WAN Connection Type is Disabled.
Under Network Setup change the first three numbers of the Router IP to be the WAN IP address you wrote down earlier, but change the last digit so it is one digit up from the last digit of the Gateway address you wrote down. For example, for our numbers we got a WAN IP address of 192.168.1.132 and a Gateway address of 192.168.1.1, so our new Router IP will be 192.168.1.2. If your last digit comes out to be 255, change it to be 2 numbers down, to be 253.
Enter the Subnet Mask that you wrote down earlier, and put the Gateway address you found in both the Gateway and Local DNS fields.
Check Assign WAN Port to Switch under WAN Port, this will allow you use the internet port on the router just like one of the four switch ports.
Click the Save button. For reference, here is what our Setup>Basic Setup tab looks like.
Go to the Setup>Advanced Routing tab. Change the Operating Mode to Router. Save.
Go to the Services>Services tab. Set DNSmasq>DNSMasq to Disable. Save.
Go to the Security>Firewall tab. Uncheck all of the boxes, but leave Filter Multicast checked. Set Firewall Protection>SPI Firewall to Disable. This configuration will rely on the firewall running on the Gateway or host AP device, just like if you were directly connected to it. Click the Save button.
Then wait a moment and click the Apply Settings button.
You will need to disconnect from the DD-WRT repeater, then reconnect. You may need to wait 30 seconds or so for the repeater to reboot. If everything is working, when you reconnect you should have an IP address issued to you by the remote / host AP. Be sure to make a backup as mentioned in the following section of the tutorial.
Also, after applying the settings the DD-WRT setup page URL will change to the router IP address you determined earlier.
If things are not working, you can reset the unit to defaults as mentioned in the below section of the tutorial, then reconnect and bring up the setup page at the default address http://192.168.1.1. From here you can reconfigure for normal repeater mode or restore your normal repeater backup. Make sure you did not skip over anything when following this tutorial.
One thing you may have do to in order to get things working correctly is manually specify the channel on the Wireless>Basic Settings tab. A few models of D-link routers require this extra step. With everything working in normal repeater mode go to the Status>Wireless tab and take note of the channel being used. Then, go to the Wireless>Basic Settings tab and change the Wireless Mode under Physical Interface to AP, then Save. This will cause the field which allows you to change the Wireless Channel to appear. Set the channel noted earlier, then Save. Then change the Wireless Mode back to Repeater, and save again. Then follow this tutorial again from the beginning to assure everything is set correctly.
If you continue to have issues, contact us.
A few more tips..
Feel free to explore the DD-WRT setup page on your own, but be sure to make a backup when you get a working configuration for your implementation. This is done under Administration>Backup and will allow you to restore your configuration in the event something goes awry.
If you really mess up the configuration or forget a password, you can always reset the unit back to the default configuration. This is done by powering up the unit, then holding the reset button on the back of the router with a pen for about 20 seconds or until the power light flashes at a regular interval. About a minute later the unit will have rebooted and be accessible again.